Website Widgets
Swiftlier provides 'standalone' Course Search, Tutor Search, Shop and Checkout functions, to which you can link from pages on your website.
However, for a smoother buyer experience and for consistency of brand feel, we would recommend embedding one or more of Swiftlier's website widgets on your site.
Available widgets and how to deploy them are described below.
On this page:
- Adding a Swiftlier Script tag to your website
- Adding a Dates and Times Bookings Widget to a product page
- Adding a Course and Service Search Widget
- Customising the Course and Service Search Widget
- Showing and Hiding filters in the Course and Service Search Widget
- Adding an Instructor Search Widget
- Customising the Instructor Search Widget
- Hiding all Filters in the Instructor Search Widget
- Adding a Service Browser Widget
- Customising a Service Browser Widget
- Adding a Book a Trial (Tutor) Widget
- Adding a Book a Trial (Service/Instrument) Widget
- Adding a Basket Icon to your navigation
Adding a Swiftlier Script tag to your website
The first step to embedding widgets on your website is to add a Script tag to the HTML of your website, inside the Head section.
This can be added individually to each page on which you plan to call a widget. Alternatively, you may find it easier to place the script on all pages of your site in one go.
All popular content management systems will feature the option to add custom code snippets into the <head> of your site - on all pages or individual pages. For example, you can see Webflow's help documentation here and Wix's here.
The Script will look like this:
<script src="https://shop.[yourwebsiteURL]/scripts/swiftlier.js" defer ></script>
Please contact your Customer Success representative to confirm the precise HTML for your Script.
Adding a Dates and Times Booking Widget to a product page (expanded and condensed versions)
You can make it possible for customers to see dates, live availability, and book directly from a product, course or service page by using one of two types of Dates and Times Booking Widget.
To add either the Expanded or Compact versions, first ensure you have the Script tag on the page(s) to which you are trying to add the Dates and Times Widget.
Then, to the web page, add a Custom Code block or similar in the place you would like the Dates and Times Widget to show.
For the Expanded Dates and Times Booking Widget
The Expanded Dates and Times Bookings widget will look like this:
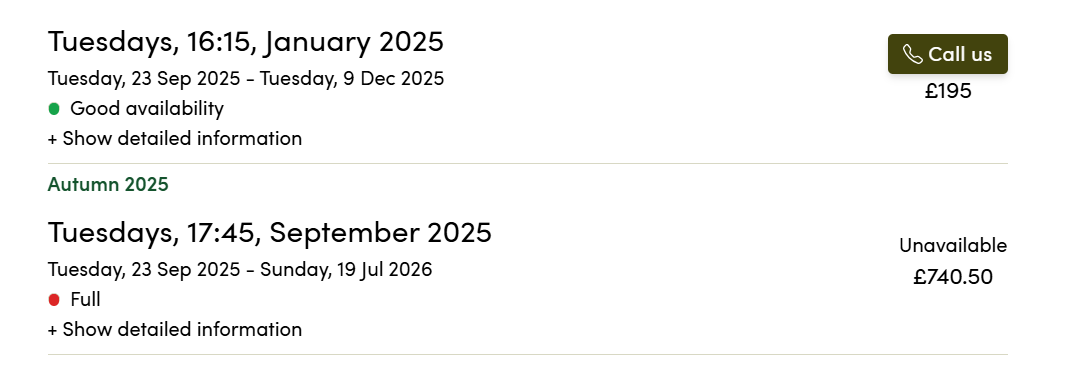
To show this, add the following to the Custom Code block:
<service-dates product-id="[insert Swiftlier product ID]"></service-dates>
You can find the Swiftlier product ID inside Swiftlier HQ - search for the Course or Service you're interested in using the Smart Search, and then look at the URL. You will see a string starting with the letters prd - this is the Swiftlier Product ID:

For the Compact Dates and Times Booking Widget
The Compact Dates and Times Bookings widget is useful where you have less space available, and is especially valuable for improving usability and the booking experience on mobile devices. It will look like this:
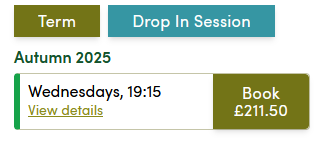
To show this, add the following to the Custom Code block:
<service-dates product-id="[insert Swiftlier product ID]" compact="true"></service-dates>
You can find the Swiftlier product ID inside Swiftlier HQ as explained above.
Populating a Dates and Times Bookings Widget with dynamic website content
It is likely that you will have several product pages on your website. To save you the time of individually configuring the webpage content for each product separately, you may have decided to use dynamic content, offered by Webflow as CMS and Wix as Collections.
It is possible to set a field against your collection called 'Swiftlier Product ID' and populate this with the prd values from Swiftlier (available in a download from Settings>Services).
You can then call this Swiftlier Product ID field from your custom code, and your content management system will dynamically populate the area of the page with the right version of the widget for the right course.
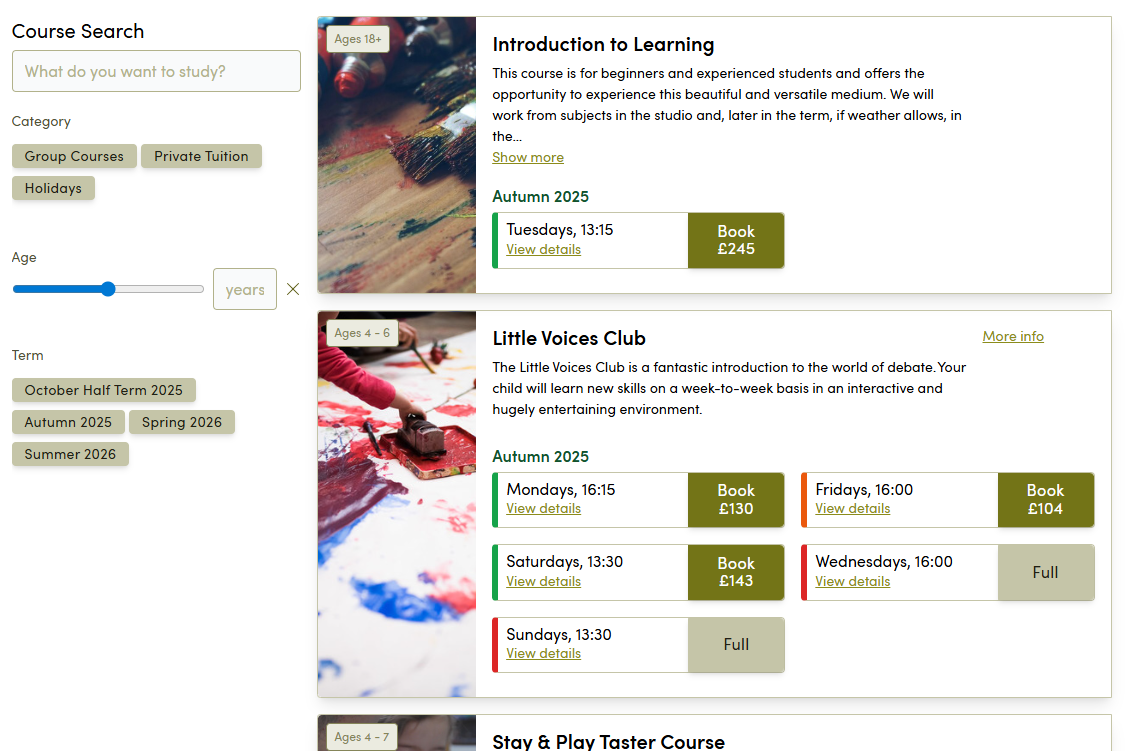
Adding a Course and Service Search Widget
A standalone Course and Service Search feature is available for you at https://shop.[yourwebsiteURL]/search
However, you may wish to customise the introductory text, or display this using your website's header and footer.
To embed a Search on a page of your site, first ensure you have the Script tag on the page(s) to which you are trying to add the Course or Service Search Widget.
Then, to the web page, add a Custom Code block or similar in the place you would like the Course and Service Search Widget to show.
In the Custom Code block, add the following:
<service-search></service-search>
The Course and Service Search widget will look like this:
Customising the Course and Service Search Widget
You can customise the Course and Service Search Widget in a number of ways to produce a focused version useful in particular scenarios.
Pre-Selecting Filters - Category, Age, Search, Time Period and Tags
Category
You may wish to use a pre-filtered version of the Course and Service Search widget to showcase all of the courses in a particular Category or sub Category on a landing page (e.g. Group Courses only). You can do that by adapting the Custom Code block to:
<service-search category-id="[insert Swiftlier Category ID]"></service-search>
You can find the Category ID on your standalone shop - head to the shop URL, click one of the categories or subcategories from the left-hand side (on desktop) and then look at the URL. You will see a string starting with the letters cat - this is the Swiftlier Category ID for your selection:

For example:
<service-search category-id="cat_SWFC5Cd1z0aiTAGS6CBFwg"></service-search>
Age
You may wish to use a pre-filtered version of the Course and Service Search widget to showcase all of the courses available for a particular age of attendee (e.g. Courses for 12 year olds). You can do so by adapting the Custom Code block to:
<service-search age="[insert age as a number]"></service-search>
For example:
<service-search age="12"></service-search>
Search
You may wish to use a pre-filtered version of the Course and Service Search widget to showcase all courses matching a particular search string (e.g. Singing Courses). You can do this by adapting the Custom Code block to:
<service-search search="[insert search string]"></service-search>
For example:
<service-search search="singing"></service-search>
Time Period
You may wish to use a pre-filtered version of the Course and Service Search widget to showcase all courses happening in a particular time period (e.g. October Half Term). You can do this by adapting the Custom Code block to:
<service-search time-period-id="[insert time period id]"></service-search>
You can find the Time Period ID in your standalone shop - head to the shop URL, click one of the time periods from the left-hand side (on desktop) and then look at the URL. You will see a string starting with the letters tpd - this is the Time Period ID for your selection:

For example:
<service-search time-period-id="tpd_oUH8iraCmEyeZQGZFRCafg"></service-search>
You can include multiple time period IDs if you wish to do so, e.g. if you wanted to create a combination of October Half Term and Christmas holiday courses. You can do this by including multiple Time Period IDs, separated by a comma, within the quotation marks.
For example:
<service-search time-period-id="tpd_oUH8iraCmEyeZQGZFRCafg,tpd_sC6uhp1InEiL8YN7dXm5aw"></service-search>
Tags
You may wish to use a pre-filtered version of the Course and Service Search widget to showcase all courses tagged with a particular service tag (e.g. Halloween-themed courses). You can do this by adapting the Custom Code block to:
<service-search tags="[insert tag id]"></service-search>
You can find the Tag ID in Swiftlier HQ - head to the HQ Settings, find Service Tags, click the arrow next to the Tags you wish to filter on, and look at the URL. You will see a string starting with the letters tag - this is the Tag ID for your selection:

For example:
<service-search tags="tag_n3uBKvlKMUG9KAGZleTwyg"></service-search>
You can include multiple Tag IDs if you wish to do so, e.g. if you wanted to create a combination of courses tagged with Halloween and Christmas. You can do this by including multiple Tag IDs, separated by a comma, within the quotation marks.
For example:
<service-search tags="tag_n3uBKvlKMUG9KAGZleTwyg,tag_6pc04sn1IEO37QGZlenX-g"></service-search>
Combining pre-filters
It is possible to combine the pre-filters above to produce even more focused combinations - for example, you could pre-filter to the Group Courses category in the Autumn 2025 time period by using:
<service-search category-id="[insert Category ID for group courses]" time-period-id="[insert time period ID for Autumn 2025]"></service-search>
Showing and Hiding filters in the Course and Service Search Widget
Hiding the entire left-hand side
You may wish to prevent customers from filtering the Course and Service Search widget themselves - most commonly because you've already done it for them using a pre-selection.
To do this, adapt the Custom Code block to:
<service-search hide-filters="true"></service-search>
Showing and Hiding individual filters: account-level defaults
For each Swiftlier account, there is a default rule that governs whether particular filters are visible as standard.
The basic rules are:
- the "Core" filters of Search, Category, Age and Time Period are visible by default in the Search
- any Service tags that you add are hidden by default as filters in the Search
If you would like to change this default, please contact your Customer Success representative.
Showing individual filters
It is possible to show only one filter. To do this, add one of the following to the Custom Code block for the Course and Service Search widget:
- use-age="true"
- use-category="true"
- use-time-period="true"
- use-search="true"
- use-tags="true"
For example:
<service-search use-search="true"></service-search>
Note: even if your account-level defaults are set to include filters or tags as standard, as soon as you include one of the above adaptations, the rest will be hidden. This is because Swiftlier assumes you have taken manual control, and are building the filters yourself. See below on combining these to include multiple filters.
Showing multiple filters
It is possible to combine filters to show a subset if you wish. For example, if you wanted to only give website visitors the ability to enter a text Search and then filter by time period, you could use:
<service-search use-search="true" use-time-period="true"></service-search>
Hiding individual filters
It is possible to hide individual filters from the Search. To do this, add one of the following to the Custom Code block for the Course and Service Search widget:
- use-age="false"
- use-category="false"
- use-time-period="false"
- use-search="false"
- use-tags="false"
For example, the following would hide the time period only:
<service-search use-time-period="false"></service-search>
Note: when setting filters as false, your account level defaults will still be respected. For example, if your account level default is for Category, Search, Age and Time Period to be shown, but Tags to be hidden, and you use the above to hide Time Period, then Search, Age and Category will still be shown (you don't need to 're-declare' that you want to include them). Likewise, you don't also need to re-hide the Tags.
Hiding individual tags or tag categories
The above controls allow you to show or hide all tag categories. However, you may wish for only certain tags or tag categories to be hidden from customers on particular pages. For example, some tags might only be relevant to particular age groups, e.g.:
- a tag category of "Drop Off" with tags of "Drop & Go" and "Stay & Play" is only relevant for Early Years courses
- a tag category of "Minimum Required Level" with Tags of "Beginner", "Intermediate" and "Advanced" might only be relevant for Adult courses
In this example, should you be building a Course and Service Search Widget for Adult courses only, you may wish to hide the first tag as it's not relevant. You could do that through changing your Custom Code block to:
<service-search use-tags="true" tag-categories-to-hide="Drop Off"></service-search>
You may also wish to hide individual tags from the left hand side. In the above example, if you did not have any Advanced courses for adults, including the tag might be frustrating for the user. The script would look like this:
<service-search use-tags="true" tag-categories-to-hide="Drop Off" tags-to-hide="Advanced"></service-search>
This instructs the widget to:
- Show tags
- Then hide the category of "Drop Off"
- Then hide the tag of "Advanced"
Hiding Tags and Categories uses text strings to dictate which ones should be excluded. For this reason, Service Tags must be unique in name. You can read more about creating Service Tags elsewhere in these Docs.
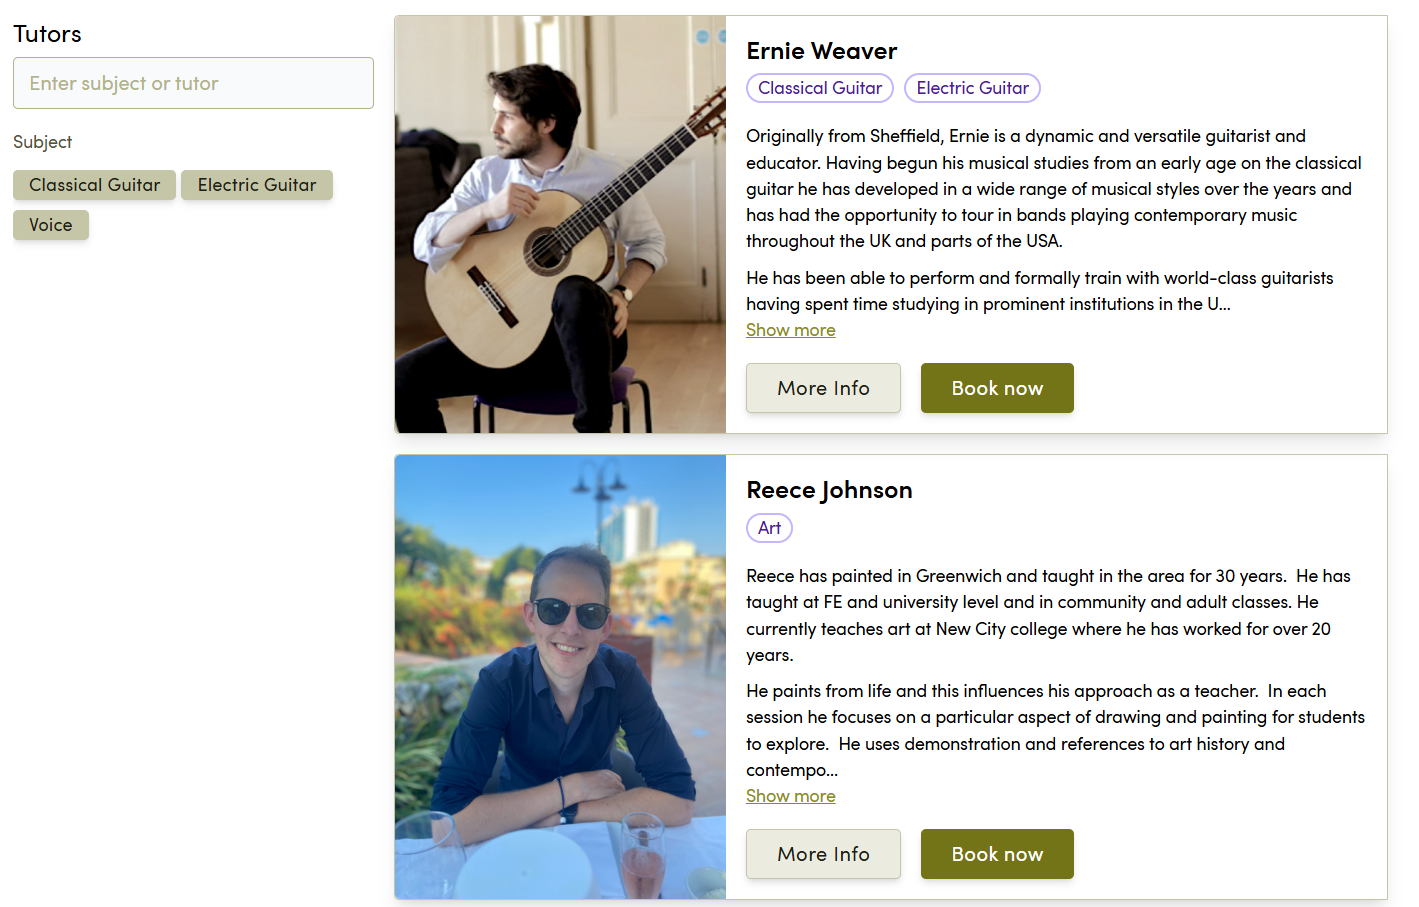
Adding an Instructor Search Widget
You may wish to showcase your Tutors or Instructors in a searchable list. Swiftlier also offers the ability for customers to Book a Trial session online with certain tutors - you will need to enable this on the Tutor's profile, and then complete their Availability and their Competencies so Swiftlier knows when and for what they can be booked.
A standalone Tutor Search feature is available for you at https://shop.[yourwebsiteURL]/tutors
However, you may wish to customise the introductory text, or display this using your website's header and footer.
To embed a Tutor Search on a page of your site, first ensure you have the Script tag on the page(s) to which you are trying to add the Tutor Search Widget.
Then, to the web page, add a Custom Code block or similar in the place you would like the Instructor Search Widget to show.
In the Custom Code block, add the following:
<instructor-search></instructor-search>
The tutor search widget will look like this:
Customising the Instructor Search Widget
You can customise the Instructor Search Widget in a number of ways.
Pre-Selecting Filters - Search, Subject and Tags
Search
You may wish to use a pre-filtered version of the Instructor Search widget to showcase all courses matching a particular search string (e.g. woodwind). You can do this by adapting the Custom Code block to:
<instructor-search search="[insert search string]"></instructor-search>
For example:
<instructor-search search="woodwind"></instructor-search>
Subject
You may wish to pre-select an instrument on the Instructor Search widget to show all tutors for a particular instrument (e.g. piano). You can do this by adapting the Custom Code block to:
<instructor-search service-id="[insert subject ID]"></instructor-search>
You can find the service ID for the service / instrument you want to pre-select in Swiftlier HQ. To find it, access the Swiftlier HQ, then use the Smart Search (CTRL+F) to find the service / instrument you want to filter on. On that intrument's page, take a look at the URL. You will see an ID number that starts with the letters prd - this is the service ID:

For example:
<instructor-search service-id="prd_IqFF69pdQkGZ8AGS6B7QZQ"></instructor-search>
Tags
You may wish to use a pre-filtered version of the Instructor Search widget to showcase all tutors tagged with a particular service tag (e.g. you may wish to have separate widgets for tutors who teach art, drama and music). You can do this by adapting the Custom Code block to:
<instructor-search tags="[insert tag id]"></instructor-search>
You can find the Tag ID in Swiftlier HQ - head to the HQ Settings, find Service Tags, click the arrow next to the Tags you wish to filter on, and look at the URL. You will see a string starting with the letters tag - this is the Tag ID for your selection:
Hiding all filters on the Instructor Search
It is possible to hide the filters from the Instructor Search widget, to prevent further filtering from particular pages - e.g. if you wanted a widget for a "Banjo Tuition" webpage that only showed the Banjo tutors, further filtering by the customer wouldn't be necessary.
You can achieve this by adapting the Custom Code block as follows:
<instructor-search service-id="prd_jKlkszYD30-23AGS6B7QZQ" hide-filters="true"></instructor-search>
The above script tells the widget to only return one service, and then hide the filters.
You can also hide particular tags and tag categories - to do this, follow the instructions in the above section called Hiding individual tags or tag categories in the Course and Service Widget section, replacing service-search with instructor-search as required.
Adding a Service Browser Widget
Your standalone Shop presents your range of courses in two ways - one is a 'Search' interface that enables your customers to apply filters and search terms. This behaviour is replicated by the Course and Service Search widget.
The other presentation is the 'Apply' view, which guides customers through the hierarchical Categories of your courses using tiles, with thumbnail images. For example, to find a Landscape Painting course, customers could click through Group Courses > Adults > Art to then find the list of Group Art Courses for Adults. This interactive way of browsing your catalogue can feel more like a "buying" experience (as opposed to the "browsing" experience of the Search widget) and is more likely to be useful when the potential customer already knows the course or service they wish to book.
It is possible to insert this 'Apply' behaviour on any page of your website, using a Service Browser Widget, and then link to it via email campaigns to promote a particular product group. The instructions for this are:
- Ensure you have the Script tag on the page to which you are trying to add the Service Browser Widget.
- To the web page, add a Custom Code block or similar in the place you would like the Service Browser Widget to show.
- In the Custom Code block, add the following:
<service-browser></service-browser>
Customising the Service Browser Widget by category
If you would like to speed up your customer's journey through the Service Browser, you can target a particular Category. So, in our example above, we could pre-select the Group Courses > Adults choices for the customer, leaving them to choose Music or Art, and make their final product selection. To do that, you can add a category attribute to the code as follows:
<service-browser category-id="cat_SW5Cd1z0aiTAGS6CBFwgFC"></service-browser>
You can find the Category ID in the standalone Shop - add /apply to the end of your Shop URL, and watch the category parameter in the URL update as you click through the tiles. When you reach the stage at which you'd like your customers to enter, then take cat parameter from the URL and add it into the service-browser custom code as above.
Adding a Book a Trial (Tutor) Widget
You may have profile pages for each tutor on your website already, for example for SEO purposes.
In such cases, you may wish to add each tutor's Book a Trial widget onto their page, so that visitors can book a trial without having to go back out to your Tutor Search feature.
To embed a Tutor Search on a page of your site, first ensure you have the Script tag on the page(s) to which you are trying to add the Book a Trial (Tutor) Widget.
Then, to the web page, add a Custom Code block or similar in the place you would like the Book a Trial (Tutor) Widget to show.
In the Custom Code block, add the following:
<book-adhoc instructor-id="[insert Swiftlier Party ID]"></book-adhoc>
You can find the Swiftlier Party ID inside Swiftlier HQ - search for the Tutor using the Smart Search, click on their name and then look at the URL. You will see a string starting with the letters pty - this is the Swiftlier Party ID:

The Book a Trial (Tutor) widget will look like this:
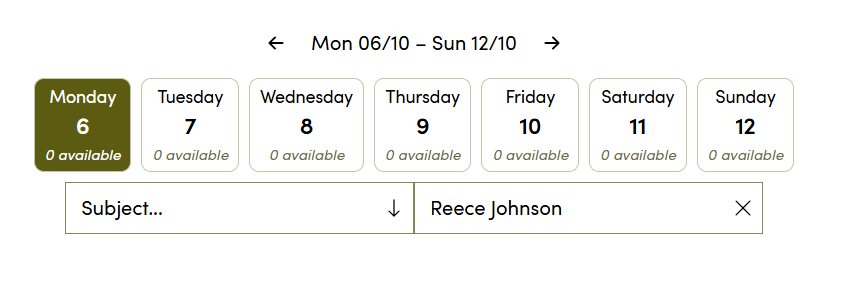
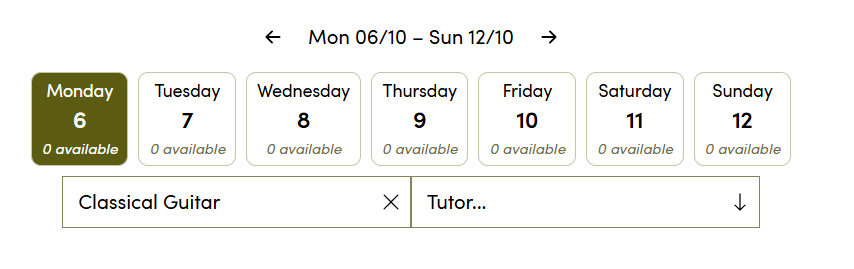
Adding a Book a Trial (Service/Instrument) Widget
You may have, or want, pages for each instrument or service you offer as private tuition - e.g. you might have a page for "Violin Tuition in Oxfordshire"
You can make it possible for customers to book trials from such pages using the Book a Trial (Service/Instrument) Widget.
To add this, first ensure you have the Script tag on the page(s) to which you are trying to add the Book a Trial (Service/Instrument) Widget.
Then, to the web page, add a Custom Code block or similar in the place you would like the Book a Trial (Service/Instrument) Widget to show.
In the Custom Code block, add the following:
<book-adhoc product-id="[insert Swiftlier Product ID]"></book-adhoc>
You can find the Swiftlier product ID inside Swiftlier HQ - search for the Tuition Service you're interested in using the Smart Search, and then look at the URL. You will see a string starting with the letters prd - this is the Swiftlier Product ID:
The Book a Trial (Service/Instrument) Widget will look like this:
Adding a Basket Icon to your navigation
You may wish to provide your customer with an indication that they have a course in their basket for which they haven't yet checked out.
To do this, you can add the Basket Icon to your top navigation.
Note: For this to work correctly, you must have the Script mentioned above running on every page of your site.
To add the Basket Icon, add a Custom Code box to your navigation. In that Custom Code box, add the following:
<basket-icon style="width: 50px; height: 40px;"></basket-icon>
You can adjust the width and height to suit the space into which you deploy the icon.
The Basket Icon will look like this: